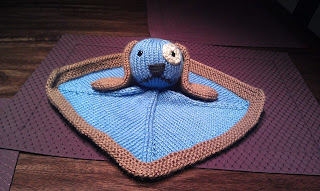
My niece has created another GREAT knit lovey pattern. Check this out
Puppy
Lovey
By Rachel
Hill
Materials
Worsted
weight yarn in 4 colors:
MC: 1 skein
of pink (blue)
CC1: 1
skein of tan (brown)
CC2: small
amount of white (tan)
CC3: small
amount of brown (black)
24in. US #6
circular needles
Set of 5 US
#6 dpns. to switch to when stitches no longer fit on circs
US #3 dpns
Safety eyes
or black embroidery thread
Poly-fil
Embroidery
needle
4 stitch
markers, one should be a different color to mark beginning of round.
Size: approx. 12" square
Gauge is
not really important but mine is 4"= 20sts and 24 rows in stockinette.
Abbreviations
B/O = bind
off
CC =
contrast color
C/O = cast
on
DPN =
double pointed needles
K = knit
K2tog =
knit two stitches together
MC = Main
color
P = purl
PM = Place marker
Rnd = round
SSK = slip,
slip, knit (slip stitches one at a time knitwise then knit them together
through the back loop)
Sts =
stitches
[ ] = repeat between brackets specified amount
if times
Main blanket:
With CC1
C/O 220 sts on circular needles
Join to
work in the round being careful not to twist sts.
Rnd 1: pm, p55, pm, p55, pm, p55, pm, p55
Rnd 2: [ssk, k to 2 sts before marker, k2tog] 4 times.
Rnd 3: p around
Rnd 4: [ssk, k to 2 sts before marker, k2tog ] 4 times
Rnd 5: p around
Rnd 6: [ssk, k to 2 sts before marker, k2tog] 4 times
Rnd 7: p around
Cut working
yarn and switch to CC2
Rnd 8: [ssk, k to 2 sts before marker, k2tog] 4 times
Rnd 9: p around
Rnd 10: [ssk, k to 2 sts before marker, k2tog] 4 times
Rnd 11: k around
Cut working
yarn and switch to MC
Rnd 12: [ssk, k to 2 sts before marker, k2tog] 4 times
Rnd 13: k around
Repeat rnds
12 and 13 until you have worked a total of 53 rnds. You will have 12 sts left
your needles. Switch to dpns when you stitches no longer fit
comfortably
on your circs. I had to switch around rnd 30. You will now begin increasing for
the head.
Head
If you are
a loose knitter you may want to consider going down a needle size so that your
stuffing doesn’t show through the stitches of the head
Rnd 1: k1fb around (24)
Rnd 2: k24
Rnd 3: k1, k1fb around (36)
Rnd 4-20: k36
Stop here
to make and sew on eye patch, place safety eyes (safety eyes are not
recommended for babies as they could come loose and be a choking
hazard) or
use embroidery thread to make eyes, embroider on nose and mouth and stuff head.
For the nose I used satin stitch and I used duplicate stitch for the lines of
the mouth. I would encourage you to do what looks best to you; you may know a
better technique then me. Also I found it easier for me to place my live
stitches on some scrap yarn while I worked the face, my dpn’s were just getting
in my way.
Rnd 21: k1, k2tog around (24)
Rnd 22: k24
Rnd 23: k1, k2tog around (16)
Rnd 24: k16
Rnd 25: k2tog around (8)
Rnd 26: k8
Cut yarn
and thread through remaining stitches to fasten off
Eye patch:
With your
size 3 dpns and eye patch color of your choice C/O 6 sts divide stitches evenly
onto 3 dpns and join to work in the round being careful not to twist sts.
Rnd 1: k1fb around (12)
Rnd 2: k12
Rnd 3: k1fb, k1 around (18)
B/O all sts
Ears:
Make 2
With CC1,
or color of your choice, C/O 12 sts onto size 6 dpns. Divide stitches evenly
onto 3 dpns and join to work in the round being careful not to
twist sts.
Rnd 1-2: k12
Rnd 3: k1, k1fb around (18)
Rnd 4-30: k18
Rnd 31: k1, k2tog around (12)
Rnd 32: k12
Rnd 33: k2tog around (6)
Cut yarn
and thread through remaining stitches to fasten off. Sew ears onto your puppy.
Finishing:
Turn your
puppy upside down and through the hole in the bottom add any additional
stuffing you may need. Once your puppy is stuffed to your liking put a few
stitches in to close up the hole. Weave in any loose ends, and congratulations
you have now finished your puppy lovey!
You may
have noticed that my blue puppy is slightly different than the pink, that's
because I made the blue one first and decided it needed slight modifications.
Just in case you want to know here are the things I did different on the blue
puppy.
I only c/o
180 sts so you would place markers every 45sts.
I only did
7 rnds of garter stitch border and used only one color.
Since I
cast on fewer stitches I only worked 43 rnds before beginning head increases.
I used
safety eyes because my 4 year old son decided it was for him and I don't have
to worry about him getting the eyes out and choking on them. Thatis it, the
only differences.
Happy
knitting!


No comments:
Post a Comment